Pages

Monday, June 29, 2020

Heavy Truck for Gaslands

So,

This past Saturday, I started working on a new Heavy truck for Gaslands, it has been something that I wanted to do for a while and it became a long project of sorts.

Heavy Truck in all its glory!
 So I forgot to take pictures of the build, but here are pics of the to vehicles I started with, one is a car hauler (some limited addition too! LOL) and the other is the Baja Hauler. I was going to use the Baja Hauler straight as it was, but realized that the cab was way too small on it when I put the Gaslands figures next to it.

Donor card for the cab

Donor car for the wheels and bed.
I thought it would be a pretty easy conversion, but once I got the cars apart, I knew I was into a pretty major kitbash. For one thing, the sub assembly of the Baja Hauler was a very soft plastic and I could not get any super glue to work. I ended up trashing it and built a new sub assembly of plastic square rod as I needed to have clearance for the bed.

Then onto the cab, I had shaved and sanded down the inside but it was just too big to fit on the under frame of the original hauler. I also had a huge gab underneath the cab and it did not look right, so i added plastice to the underside of the cab to get it to fit right and look right. I then added some pipes from the Implements of Carnage sprue as well as the plow. I also cut an opening in the back of the bed for the crew to enter/exit from. I then figured out where the crew would go and was ready for paint.

Assembled Heavy Truck

Plow added

Extra armor added 
Painting was pretty straight forward, I painted the crew before going into the bed and glued in after everything was done.  I like my Gaslands cars to look pretty distressed and worn, so I always go for that apocalyptic look as I figure no one washes their vehicles as they may not make it past the next race! So after the base painting was done, I go back with Vallejo Environmental colors to rust and dirty them up to get that grungy look to them. 

All painted up

Mean front end!

Hang onto them hats and glass folks!
 Also since I was in a Gaslands sort of mood, I did a few more guard rails and barricades for the game. I found in my hobby scrap box some HO scale pallets, which work perfect for Gaslands and decided to add a few to a couple of barricades. I love how they turned out and fit perfectly for the game.

Junk piles for barricades
So there you go, I also worked on a few terrain pieces for Necromunda, that will be tomorrows update.

TK

Monday, June 22, 2020

Fellowship of the Rings

So,

As some know, I loved the Lord of the Rings movies and when GW released their miniature game along with the first movie, I was hooked. I spent a ton of money on buying models for the game and one of the first box sets I bought was the Fellowship of the Rings. 

Now the only models that I actually painted were Legolas and Gandalf, the others got primed and then forgotten as other LotR projects came up. Well this past weekend I decided to watch the Josh Gad Reunited Apart series on Youtube and he brought back the original cast from the movies. Then we got word that Ian Holmes (aka Bilbo in the movies) passed away. So with that I decided I wanted to paint up some hobbits, which were primed up well over ten years ago. So while listening to my buddy's Video Pod cast (Whats Up with Mike & Jeff) I started painting the below models.

Hobbits

Well as the show went on, I was able to get two of the hobbits completed and I kept on going working on the other two. By mid afternoon I had them all completed, but as I looked in my project box, I still had Gimli, Boromir and Aragorn to complete and it did not feel right to leave them out, so I started working on them as well.

Well i am happy to say that I completed the Fellowship of the Ring Sunday afternoon and now well over ten years later, one of the first sets I bought for the game is completed! Here they are in their glory.

Fellowship of the Ring

So there you go, it took many many years to complete, but the orginial bad of adventures I fell in love with as a young boy reading the Fellowship of the Ring is complete. Now what other old models do I have to paint, hmm we will see...

TK

Tuesday, June 16, 2020

Finally Some Gaslands on the Table

Well,

Last Friday after work Mike from Dagreenskins blog came over and we finally got Gaslands back onto the table. It has been months since he and I got to play and it was a blast of a game. We each took two cars, mine were the Purple El Camino with Ram and a single HMG and the other was my Delivery truck with Ram, HMG & Napalm dropper. Mike took his VWs one with twin HMG and the VW Bus having Rockets!

And the Race begins
My Heavy truck decided to ram the back of the VW Rocket bus as I knew what those rockets could do to me if I ever got out front. I caused some major damage to it. Mike tried to ram his other VW into me but all we did was trade paint.

Ramming Speed!
 Meanwhile the El Camino made a break for it while the other three were playing bumper cars and I got out to a pretty good lead. Mike was able to get his VW truck out ahead of me which I finally shot up and caused him to wreck, but as fate would have it, the El Camino had no where to go and crashed into the flaming VW truck, which in turn caused me to wipe out and wreck leaving us both burning piles of junk!

Trying to Stir clear of danger!
 Meanwhile the VW Rocket Bus and my Heavy truck were left way in the back (due to Mike wiping out and smashing into the rocks and me with a Gear 3 only car. I was able to get the Heavy truck out in front and dropped my Napalm, but Mike was able to expertly drive around them while firing rockets at me and taking damage. Mike was able to finally able to cause my truck to take its last wounds and went on to win the game!

Rocket VW Bus Win!
 The game was awesome and we were both laughing at what was going on, which to me reminded me of how Blood Bowl can really mess up your plans, so too can Gaslands! It was awesome to finally get this back on the table with an experianced driver and I am sure there will be more games.

So with that, I felt like I needed to work on a few cars. So i busted out a couple of cars, the Zrod, 4x4 Bone Shaker, a 32 Coup (not pictured) and a 1964 wagon that I was painting up for my Dad.

Projects started after the game.
 The Zrod got the front tires off the Bone Shaker added to it, some plastic card to the top and the Rockets from the Weapons of Carnage sprue. The Bone Shaker then got the back wheels off the Zrod, I also added pipes and HMGs to the car as well as plastic card to the windshield.

Simple wheel swap and conversion.
 The 32 Coup was going to be for my Slime team which will be modeled after the Buzzards in the Mad Max video game. So I used plastic card and cut up blades and glued to the car, I also added the Roo Bar to the front for a ram.

Plastic Blades
 Once all that was done I moved onto the painting, the Zrod got a Yellow and Black scheme and will now be called Yellow jacket and it was a pretty quick paint up. The Buzzard was a little more time consuming as painting the blades took some time. I primed it all black then went in with a Burny Sienna followed by a Steal color. I also painted up some details on the motor before washing the whole model in Strong Tone.

Pre Wash

Post Wash (drying)
 Once the washes were dry I went back to do some weathering on both cars to finish them off with.

Two cars completed
I am still working on the Bone Shaker and the Chevy wagon, so they will be the next two to be completed in a few days. Stay safe and stay sane!

TK

Monday, June 08, 2020

Russians and Pirates

So,

Life has been interesting, now that we are starting to open back up, one more thing now has us back in our homes...sigh.

But enough of that, I have still been busy, did my last commission for my buddy Robert last week, a Regiment of Russian Napoleonic troops for him. Robert gave me some completed troops to match paint to, and I did a great job match painting them, see for yourself below. 

Roberts Russians
The other thing that ended up on the paint bench were some pirates! My buddy Merle in Kansas reached out to me a couple weeks ago and said that his local group was going to be playing Legends of the High Seas and wanted to let me know about it, basically that people were still playing my game.

So because of this, I dug through the old lead pile and found some figures to paint up. I have been painting a pirate a day and do most of it on my lunch hour as I am still working from home. Here is last weeks and this weekends accomplishment.

Pirates for the Wicked Wench
So there you go, still painting and planning, I have about 7 more pirates to complete and now I am looking at doing some terrain work for some Necromunda, so stay tuned!

TK
Tuesday, May 19, 2020

Tanks, Tanks and more Tanks!

Well,

I think I finally have gone back to playing FoW in this new edition, our group was slow in embracing it and before the Rona hit we were getting in games again. So while stuck at home, I found this lone Panzer IV F1 that needed to be painted for my DAK force, so after sitting in the box for years unpainted, it hit the bench last Friday and got some new paint.


Panzer IV F1
 So I challenged myself to see if I could paint this one tank up during my lunch last Friday. One good thing about Arizona this time of the year, is that when you prime models they dry very quickly. So I was able to paint up this in about 30 min. Now decals and weathering took place after work, but the basic paint was completed on my lunch.

Panzer IV F1
Earlier in the week I decided to order a few kits from an online distributor to add some needed tanks for my Mid War Eastern Front German army. I had been using some older Battlefront models that were without side skirts. So being a fan of Plastic Soldier Company, I ordered a box of Panzer IV's and two boxes of Panzer III LMN's.

PSC Panzer IV's
 The tanks arrived on Friday and I got to assembling the kits. Now I had built the Panzer IV's before and have 6 of them in my DAK force, but this time I would be adding the skirting around the turret. The PSC kits are good kits, but the turret skirts were a bit of a pain. On the first tank the skirting was too low and rubbed on the lower hull and got hung up on the detail. I had to file down the skirting to get them to move freely. But one that was done, they were perfect.

PSC Panzer III M's
 This was the first time to build the late model Panzer III kits, as once again I have them in my DAK force but are the earlier model types.. I built these as M's and found that the turret skirting was going to run into the smae problem as the Panzer IV's, so I took care to make sure that they were glued on correctly to not interfere with the lower hull. These kits are awesome and I really love the look of the Panzer III's with all the skirting on them and can't wait to start painting them.

I also have been working on some late war German infantry that Robert gave me to add to this force and they are currently on the paint bench now, photos and a post will be forth coming soon.

TK

Wednesday, May 13, 2020

Panther ready to Prowl

So,

The other night I completed the weathering on the Rubicon Panther, used Vallejo environmental paints and did some touch up work on, it is now ready to hit the table to hunting allied armor.

All ready for battle

Read deck detail
Vallejo paints used

Toon tank vs Historical tank
 TK

Monday, May 11, 2020

WIP 28mm Rubicon Panther

So,

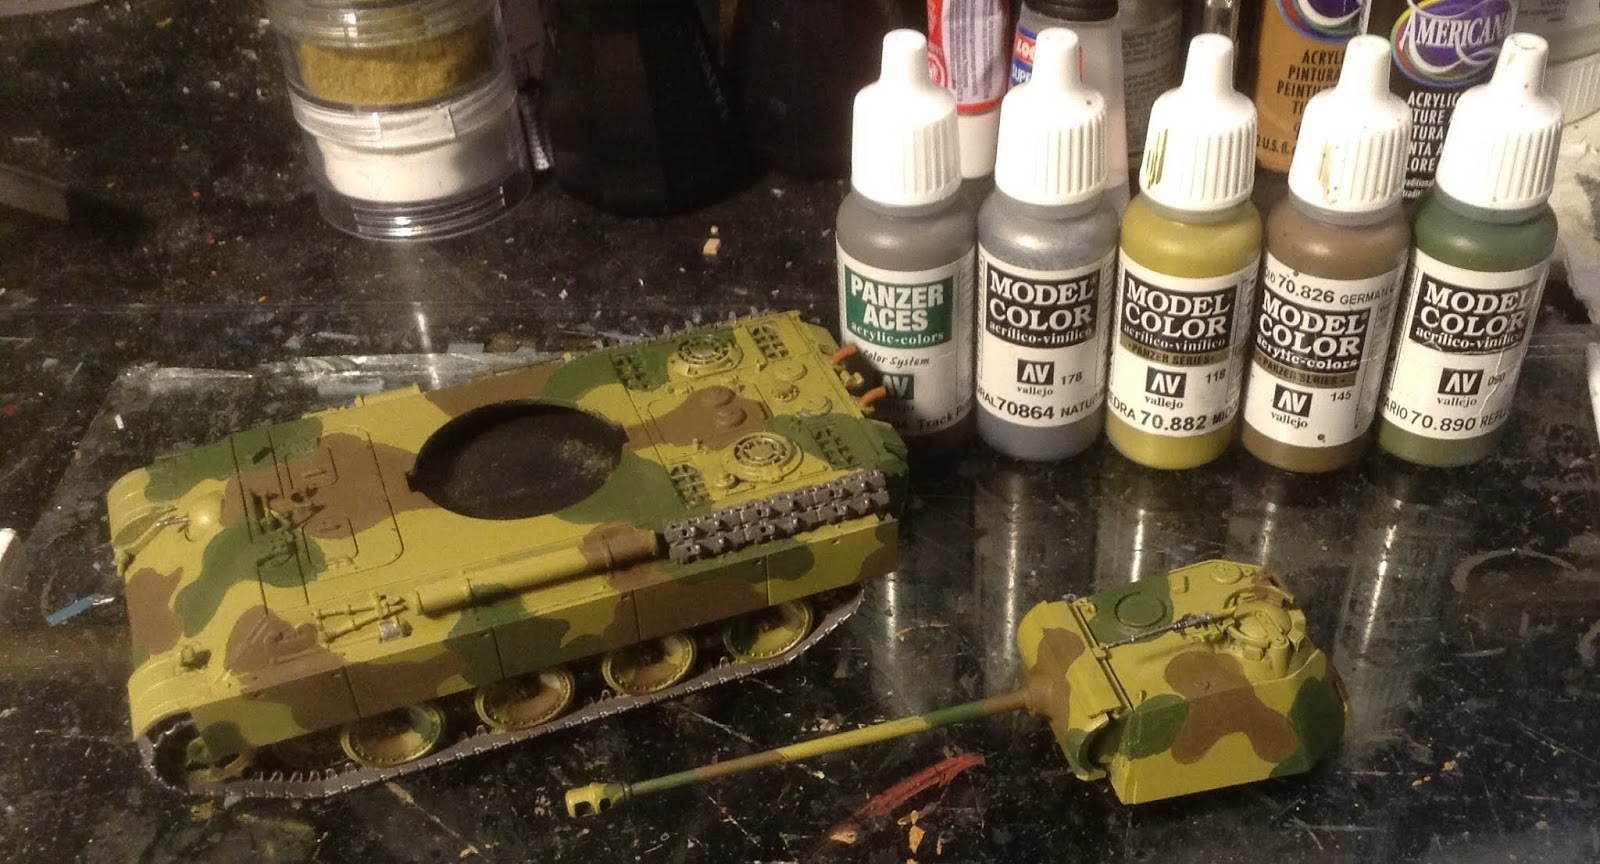
I have had this Panther sitting on my desk for over a year now and I decided to get working on it and getting some paint on it. I was going to enter this kit into our local Hobby Expo, but that is on hold. So I figured this is a good time as any to do some work.

I primed the model in Flat black, then proceeded to brush paint the Vallejo Middlestone color onto it. I have an airbrush, but just don't like to clean it so its easier to brush paint items. I also painted the treads as well with Vallejo Track primer followed by a dry brush of Natural Steel by Vallejo.

Base Color applied
 Next up came Camo Brown from Vallejo which I made some splotches on the tank.

Brown Camo patern.
I then went with Vallejo Reflective Green, which I am almost out of, so will be picking up some very soon.
Three Colors now

Next up was a wash of Army Painter Strong Tone. Once I applied that I let it sit.

Dirty Panther
So there you go, WIP up until yesterday, hopefully I can finish it up in the next few days.

TK

Thursday, May 07, 2020

Don't fence me in...

Well,

Time for some more Gaslands related projects, so for the longest time I have been wanting to make some terrain for Gaslands, specifically guard rails and barricades. So a few weeks ago I started working on some tire barricades using Nerf darts cut to the right looking width of tires and stacked them all together and glues to a base.

Nerf Dart tires!
Great barriers
 Well while surfing the old web, I saw someone post up a picture of guardrails made out of corrugated cardboard. The problem was the cardboard corrugation was too larger. Then I remembered that Drunken Sanurai gave me some corrugated cardboard for dollhouses for Spanish tile roofing. I found the scrap I still had left and it was the perfect size. Now the original poster actually peeled the backing away and glued another section to it to add strength. I just kept the backing paper of and I did not care that you can't see the ribbing from the back.

Glue, pile of sticks and cardboard.
 So once assembled I glued to some think plastic (which I ran out of after three!) and primed them up for paining. I made each section 4" long which seems to be a perfect size and I can then set them to form curves.

Paint and weathering was next and viola, three new sets of guardrails! Now I just need to make a bunch more.

New/old guardrails

For scale with my first ever Gaslands car.

Tires and rails.
 So there you go, another nice little project marked off the list.

TK

Wednesday, May 06, 2020

For Mordor!

So,

With the Stay at Home order still in effect in AZ, I worked on a few more figures this weekend. This time there were 15 Lord of the Rings models lurking at the back of the desk that I decided to paint.

First up, Nine Morgal Stalkers, I forgot ai had three packs worth (9 total) and I was planning on using these in a Minas Morgal list for LotR. Well better late then never I suppose!

9 Stalkers for Mordor!
 I also found that I had 6 Orc trackers that I had pulled out, so these guys fell to the paint brush and are now ready for action!

Orc trackers
 Now, all I need to do is talk a few friends into playing some LotR again! LOL

TK

Tuesday, April 28, 2020

CAV Strikes again!

So,

I love Robot/Mech games, one of the first games I played was the classic Battletech, I would always be buying Ral Partha Mechs and actually started selling these painted models to my local game store back in CA. But as things do, I drifted away from the game and startrd playing on the computer and many console games. BT was great, but it was more better suited for the computer then on the tabletop.

Then a few years ago I got introduced to CAV from Talon Games (was formerly with Reaper Miniatures). I worked with Jon Walker of Talon for a few years. But once my time working ended I drifted off to other games. But I had a ton of CAV models left to paint.

So this weekend I decided to paint up a few models just for fun, here is the results.


I have a few more models to work on, so I will be adding them here on the Old Blog so stay tuned.

TK

Monday, April 27, 2020

A place for a swinging wake...

Well,

Another Monday and another update from this past weekend. So a few years ago I was able to attend Reapercon down in Texas. I had the chance while there to pick up a few items, this Crypt being one of them.

Reaper Crypt
I was going to use this for games of Frostgrave, but never got around to painting it and sadly Frostgrave doesn't get played that much now. But since I had time being stuck at home, I busted it out

Front door, I wonder if anyone home?
I wanted to play around with doing a patine roof, started out black, then dabbed Hunter Green paint into the cracks and roof panel lines. Then a steal color into the center of the panels followed by a Copper color over everything followed by a Strong tone wash. I think it came out rather nicely.

Patine roof

Necromancer and assistant trying to unlock the door

Inside of the Crypt


Someone is home!

All in all this is a great kit, I did have to alter the roof to make it removable, after painting it got snug again, but nothing that won't work. Now just to get this onto the table for some games.

TK