Pages

Wednesday, June 27, 2018

Building a town...

So,

About 6 months ago I decided to pick up a few models from Sarissa Precision Ltd to add to my old west collection. Now last year I built there Old West Train for my buddy Merle and after building it, I knew I wanted one of those for sure.


With that in the cart,  I then wanted a few more buildings. But having a good selection of 4Ground old west buildings I wanted something a bit different, so I went for the South of the Boarder set 2, which had a cool looking church and train station!


With those ordered, I sat and waited for my order to arrive. My plan was to slowly assemble and build each kit, taking my time and adding a few extras to each kit as I go. The great thing about Sarissa kits is that they are a great starting point to add extras to them and they are half the cost of 4Ground kits.

So when my box of laser cut pieces arrived, I had to decide which to work on. I started with the Market stalls and quickly assembled them. I didn't take any pictures of them as they are pretty basic and I still need to decide what I want to have on each table for a market.

The first building up was a simple Adobe building, the plus I did to it was to cover the entire outside walls with model paste as I wanted it to look more like adobe. I also added working doors on the kit by taking a cue from Crescent Root Studios and just used a simple piece of black duct tape to allow the door to open. I also textured the base so it would look better on the table.

Two story adobe

The next building up was the cantina as i needed a proper Mexican looking bar. I was excited about this kit, but once I pre assembled it, I was bummed by the overall size inside the cantina. I had wanted to add a few tables but it would be too tight to move any other models around in it. But I still love to overall look of the building. I added working doors as well as modeling paste to the outside as well.

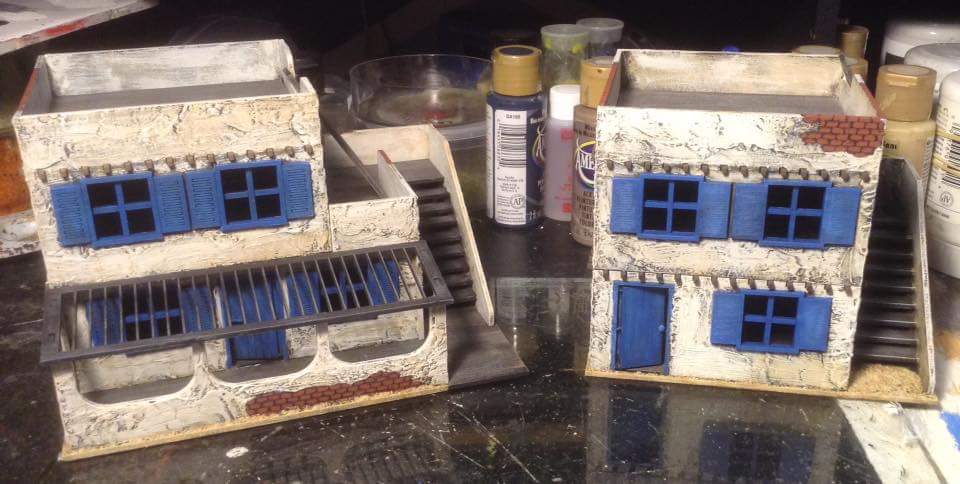
Cantina on left with 2 story adobe on the right.
My next building was the Hacienda kit, once again I loved the look of the kit but I wanted to do something with the roof. Mexican buildings have a Spanish style look to them and I wanted to do a Spanish tile roof, but struggled to find anything that looked right. But then Drunken Samurai came to my aid by giving me some very finely corrugated card board that he got from another friend. This stuff must be for dollhouses as once it was cut into strips and glued on, it gave a very nice Spanish style roof. So big shout out to Drunken for saving the day!!!

Nice simple building.
I also made all the doors work but opted out of adding modeling paste to this one as it had some nice detail etched into the wood. The only down sided to this kit is there is no stair way up to the second floor, neither on the outside of inside, that's not a deal breaker but just bummed that there is no way up there.

Spanish Church in the rough

The next building that is on the bench is the Spanish Church, it is currently being painted but the few additions I did too this one are Spanish tile on the roof, the front doors open and I added a bell to the bell tower. with this kit I also pre-painted the inside white, as I now have learned that doing this is much easier than trying to do it while assembled.

Next up will be the Spanish style railroad station, i will be adding the tile roof to this one, this will be pretty much it. I may add some details to the inside of the station, we will see.

From Sarissa's website.

So stay tuned, more pictures will be coming as I get ready to start on the train!

TK

Tuesday, June 12, 2018

Life in the Underhive is Harsh!

So,

I really have been enjoying going back to the Necromunda and playing the game again. For me Necromunda was one of the coolest settings in the 40K universe, and I thoroughly enjoyed the game back in the day. Now that it has been out, DrunkenSamurai and I have played through the basic scenarios, both of us enjoying the standard 2-D game.

Well this past weekend I brought out an old favorite, the Van Saars (with new Models) onto the table to show our buddy Tom how well the game works. I took a stock gang equipped just like the instructions for the new box came and headed into the Under Hive to face Drunken Goliath's in scenario one.

Now you may notice the walls, these are from Death Ray Designs that I picked up for Drunken while at Adepticon this year. By adding these walls, it really changes the game, you start to loose where your enemies are on the board and just bring a cool vibe to the game. Drunken is still painting them and they are paint heavy on details, so it will take him some time to get through them. I am looking forward to getting a set for myself in the very near future.

So below are a few shots from this weekends game, enjoy!

Champion and two Gangers

Leader, ganger and Champion.

Leader shoots at charging Ganger!

The Van Saar leader is Taken out of Action!
So there you go, a brief update as to what I have been playing recently and I am loving it! Now onto bigger things...

TK