Pages

Wednesday, August 19, 2020

KAT Attack truck

 Welcome Gaslands fan

I kicked out another cool conversion this weekend, this one I call KAT Attack and is a rather simple conversion. All parts are from the Implements of Carnage sprue from Northstar. I added the Ram, air intake, machine guns and the launcher to the rear, that was it.

KAT ATTACK! 

The model is the Erikenstein car and was originally a grey color, I of course disassembled the car and stripped the paint and chrome off of it. Once dry I mounted the guns and launcher to the model. I had to wait to place the Air Intake and plow on after I put the car back together. Then it was a prime of black and wait to dry.


Slick looking profile


I painted with a mix of Creamcoate and Reaper paint to get the yellow then did a flesh wash from Army painter on the model/ At this point I liked how it looked, but once the wash was dry I went back in to clean up the wash in areas that I did not like how it pooled up.

Mean rear end

Once that was done, I went at it with my Vallejo Environmental colors to dirty it back up with rust and grime. Before I did that I added the decal of the skull (from a 40k decal sheet) to the sides. This little decal really makes the truck pop and ia a great eye catcher for the model. 

Ramming Speed!

So there you go, another build for Gaslands and only took a day to do as well, can't wait to get it on the track!

TK

Monday, August 17, 2020

A Very Pulpy weekend.

 Hey folks,

This past weekend was a very productive weekend and it all focused on Pulp. A couple of buddies this weekend were doing a sort of Hobbycon weekend working on the new 40K box set that just came out and were looking for folks to join along. Well I am not interested in 40K nor did I buy said new version, I decided to work on what I had, so Pulp miniatures were on tap.

Models completed on Saturday

 I was able to complete five figures on Saturday and as Sunday rolled around, I busted out a few more models. Four out of the five are more old west, more like Mexican revolution, but they can be used in Pulp games, and the fifth model was a true pulp adventurer all from Pulp Figures..  


What a Wild Bunch we have there.

So I was able to get another five completed and as I was working on these, I got notification that my Sarissa Precision  order would be delivered today! So not only would I have completed 10 figures, but I was getting some terrain today.


Box from the UK smelling of burnt wood!

I ordered the Far East building pack, a dock and two Steam Powered launches all intended for Pulp gaming or Pacific WW2 gaming.

My terrain haul!

I was so excited to be getting my terrain that I started work on them as soon as it showed up. The first item I set about building was the dock, pretty straight forward kit, although I decided to add rope wrapped about the supports for the dock. Just some natural twine used for bracelets, which adds a nice little touch to the dock.  


part of the dock which includes another section, so a Paradox!

Once I had the dock assembled, I turned my attention to the steam launch, and I was very happy to be assembling these. And if you know me, I was a skipper on a very similar looking boat trudging down jungle rivers for many years. This kit is a neat little kit, in the picture below I have the hull completed and just have the canopy sitting there, my plan is to extend the canopy all the way over the boat and I will be using tissue paper for the canopy and making another set of frames to hold it up. The Steam boiler does go up towards the front, but I will be making a replacement that looks more like I am used to seeing in the boats I piloted. 

I get paid for the number I take out, not how many I bring back!

here is a combo picture of the dock and the boat together, which is perfect for what I am going to use it for!

Watch your step and don't step on your watch!

I ran out of steam and was not able to finish more on the boat, but will be working on it throughout this week. So stay tuned friends, more dispatches from the Jungle soon! 

Kungaloosh!

TK

Thursday, August 13, 2020

Tired of it all...

 Hey Fans,


Sorry for the depressing title, no I am not giving up on life or my hobby, but I am getting tired of the latest vibe with one of my hobbies. I am pretty sure this feeling is from the current state of affairs with the world and the Rona, but I am getting tired of Games Workshop and the current trend of collecting being the main focus for the hobby.

I started my war gaming hobby with a few old classic GW games like Space Hulk and Blood Bowl and I moved onto to Warhammer Quest, Fantasy Battle, Battle Fleet Gothic, Epic, Lord of the Rings, Warhammer 40K, AOS, Kill Team and a few others. I have been a fan of all of their games and of recent love the models that they are turning out. yes i am a GW gamer at heart. I have spent tons of money on games and have had a great time with all of them. In fact some of the other versions have pulled me back into the fold and spent a lot of time working on newer models.

But I have started to wonder if its worth it anymore? Its not the money, I am not really enjoying the games like I used to when i was younger. I used to get all fired up thinking about games, campaigns and new projects, now I just feel sort of like Ehh. Perhaps its being older, my attention is not like it used to be and even the drive is not there like it was.

I wonder if this feeling is the same with others? Is there a point that we reach with GW games that is the end? Am I alone thinking like this? As I said at the top, some of this is brought on by the fact I can't game as much right now, I keep hearing this thing will pass, but its been almost 6 months and its still here, dosn't look like its going away anytime soon, but I will not go there. The other part of it was just yesterday I was looking through my book shelf and I still have two copies of old Warhammer Fantasy, a couple of editions of 40k books and a few other game rule books from GW, I have at least a two dozen rulebooks and it dawned on me, why do I still have these??

That is what got me thinking, am I done with Games Workshop? My most recent projects have me thinking about Pulp games, WW2 games and other games (Gaslands) that I would rather be playing. The drive to do anything for GW is just not there. perhaps the saying is true, with age comes wisdom, maybe I am done spending money with a company that dosn't seem to value you me anymore (if they ever did that is). 

So I am just wondering, is this depression of GW coming from the Rona? Is it coming with Age? I can't be the only one who feels like this (or am I?). I would love to hear your thoughts and comments.

TK

Monday, August 10, 2020

Quiet on the set!

So,

This weekend I busted out a few Pulp Alley & Pulp Figures miniatures to work on, I love pulp games and I wish I got to play more of them, but my local group is not as interested as I am. But that not withstanding I still paint up figures and terrain for games I will run.

This Weekends painting

Not sure what got me in the mood to bust out these, maybe the GW info about Blood Bowl that had me down, but I felt inspired to paint and pretty much the whole weekend to do it. I just have to say that I really love Pulp Figures miniatures, they are so charismatic and in a way, very simple to paint. Unlike GW which are very detailed almost to the point of over detailed, Pulp Figures are much more of a joy to paint for me and I always get great results. 

Take 81!

Pulp Alley miniatures are in the same vain as the Pulp Figures and this was my first set of them to paint up. I had used these models for years when I ran demos, showing people the figures that Dave was now making. So I decided to paint them up finally after all these years.

And Action!

I also tried a new Red hair color on the Red Queen model from Pulp Alley, I have always gone with an orange with a red wash, this time I started with the same color as I used on the model on the left below, its a color called Yellow Ochre from Americana. I then used a red wash that was watered down and applied that. Once it set I used a Reaper Marigold Yellow 09007 as highlights, its more a yellow/orange color and looks awesome as a high lite for much more realistic Red head. 

Pulp Girl & Red Queen from Pulp Alley

Anther shot of these beautifully sculpted models.

I also got around to getting this Limited edition Empire of the Dead model painted up, which I named Professor Cox, a crazy nar do well bent on about bringing all kinds of calamities down on society. I have a tendency to name some of my characters after friends, this one is no different, He is named after my good friend Noel Cox, who I used to work with at Disneyland. Noel went on to work as an animator on the Simpsons and most recently is now working at Knotts Berry Farm in the living Calico players as the Deputy Mayor of Calico.  I shot a picture of the mini to Noel, and one day I will have him going in a game so he can bring his creation to life on the tabletop!

Professor Cox and Evil Doctor of Mayhem!

I also did up these two, the model on the left is Pulp Alley while the model on the right is a Pulp Figure, both fit the bill as Good Cop and Bad Ghestpo agent and will be used in many a games.

You do know I am holding a Tommy Gun right?

So there you have it, some daring Heroes, some lovely ladies and a few bad guys thrown into the mix, all and all a great turn out of characters for some pulp games.

TK

Wednesday, August 05, 2020

The Sea Duck

Well, 

This took longer then I thought, but I got the Sea Duck completed last night. This is a Lindberg 1/48th Grumman Goose kit which I will use for Pulp gaming. if your old enough you will recognize this plane from the Tales of the Golden Monkey series that used to be on TV back in the 1980's.

1/48th scale kit

This kit is a fairly simple kit and the detail is not that great, but as a gaming piece, its perfect and the price is very reasonable, I think I paid $15.00 including shipping.

Built in only about an hour, that's how simple of a kit it is.

As I was going to be using this as a gaming piece, I assembled the entire kit in about an hour and even glued in the windows as I would paint over them. The kit has no detail inside, so that was a major reason I would paint over the windows.

All built and ready for the paint. 

I sprayed the entire model in a nice looking gray from Tamyia (actual IJN grey). I then waited a week for it to dry and then masked off the areas to be painted black and shot that color on. I wanted to use all rattle cans for this project. Once I let that dry, I cam back in and hand painted the cowls red with thin coats of Reaper Red. I then painted up the engine and washed it with strong tone wash.

At this point I realized that I sis not do a great job of masking off the aircraft and some of the black bleed through, no worries I thought, I would just touch up and color match the areas. Well that did not work and now I had different colors. I contemplated re shooting the plane and masking off the areas (cowlings) in the grey, but after thinking about it, I decided to use Reaper Blitzkrieg Grey (from the CAV line of paints) to repaint the aircraft to more of a white color by hand. Now being a gamer, I am used to that, but was worried about it as I use thin coats of paint and when I started on it I thought I messed it up even more. So I went to bed and hoped that the plave got lost in the Bermuda triangle or something.  

Looks much better!

Well after sleeping on it, I went back to the plane and started another coat of paint, this time it went much better as the first coat was not covering it completely but the second coat was. This gave me hope and I pressed on. I touched up the black areas that I had made a mess on and finished the windows. Now I am happy to say its completed and doesn't look to bad (still not perfect, but as a game piece it works).

Nice clean lines

So now all I had to do was come up with a name, which I decided that it would be called The Sea Duck (from a animated TV show) and came up with a back story for the pilot, Jonathan Harrington, dashing explorer, daring treasure hunter and all around good guy!

This was supposed to be a quick project, but it lasted longer then I had planned, but its nice to call it done and now I can move onto other projects.

TK 

Monday, August 03, 2020

Opps, they did it again!


SO,

Games Workshop just announced that they are releasing another new box set along with a New hard back rule book for Blood Bowl to be released this year.

fb_img_15963827420026501679280270497201.jpg
New Version of Blood Bowl Already?

So, I have very mixed feelings about this, on one hand, I am glad that GW is supporting one of my all time favorite games, then on the other side I think What the Hell GW???

I started playing BB back with the 2nd edition back in 1988, I loved the game and so did my buddies. I was hooked and have bought each version up until today. This most recent edition came out 4 years ago and they are still releasing teams, but today they officially announced a newer version.

Why does this make me mad? Well that means all the money I have spent on this new game is about to go out the window! All the extra stuff like tactic cards, GW made sleeves, bought teams and extra boards, pretty much went in with both feet. Now there will be a new rule book and from what I am hearing, a new stat added to the game, so that means all the team cards, and rule books are now garbage and I would need to buy more stuff! 

Of late GW has gone to this collector mentality for the last few years, causing a sort of buying frenzy for products and I think GW dosn't mind, it helps with the frenzy and everyone wanting their products. It drives demand and I am sure GW banks on the sales spikes caused by this which helps their bottom line.

Well though for me & my situation, I think I am done feeding the GW cash cow, its time for me to take back my hobby, its not about the fevered buying and collecting, its about the hobby in general and I want to have fun with it. So I will be pumping the brakes and turning my focus to other games and spend that money on things I want and not things I need to get before it sells out!

TK

Friday, July 31, 2020

Marvel Baddies in the house

So, 

Last year I picked up Atomic Mass Marvel Crisis Protocol (MCP) game, my buddy Mike also did as well, but too many other games came out at the the same time and the game got shelved. I did manage to assemble my models, but that was about it.

MCP Game

Well, just recently my other buddy, Robert, just finished watching all the Marvel movies in a row and expressed interest in trying the game out. I also had an extra copy of the core rules that I traded to him for a few more bad guys. Anyway we talked about getting this on the table, so since I had nothing to paint, I decided to bust out two bad guys to try my hand finely painting up some of these models.

So I decided to ease into the painting and started with a favorite of mine, the Red Skull. Now its a simple paint scheme and I have painted up two other models of the Red Skull before, so I felt pretty good tackling him again.

Red Skull in all his Glory

After I completed Red Skull, I moved onto Doc Oct as my second bad guy. For such a simple paint job it was challenging to make look correct, but I am happy with the results.

Doctor Octopus 

So there you go, two MCP models painted up for the game, also I crossed a bridge, even if I never play this game, I will continue to paint up the models as the 10 year old inside of me always wanted to have Marvel Super hero models and now 42 years later I have a company making them. Now I can't wait for the Xmen to come out!

TK

Tuesday, July 28, 2020

Riders of the Riddermark

Well,

So I have been having an interesting chat on the FB group I belong to about a game that we all love playing Lord of the Rings Strategy battle Game. A good friend posted up a nice picture from another modeler and he mentioned he missed the game. This got me thinking about the game and wanting to paint up some more models for the game.

Riders assembled

So I decided to bust out the models and I also busted out my old legions of Middle Earth book and built a quick list for 347 points. Its lead by a generic Captain as I need to wait to find a Emoer model to lead them, right now its a Royal Guard model standing in.


Generic Rohan Captain leads the Riders

So my plan is to paint up the whole force by the end of August, which at first I thought no problem, then I remembered that Rohan players need dismounts if their horses get taken down, so I dug out enough Riders on foot to match the number of mounted models. I think that puts me around 36 models then.

So August will be busy as I paint these, some Marvel Crisis Protocol and some cars for Gaslands, will be interesting to say the least. 

TK 

Monday, July 20, 2020

They Live...

So,

A buddy of Mine, Mike from Ddgreenskins blog after each Grumble Bowl (local Blood Bowl event) builds a new team and he suggested why not do that myself. I had a couple of choices and a few 2nd teams, but I figured I would give it a go with a team I did not have, Undead.

Whats better then one box, but two of course!
I had one box of Undead for some time, but with the boxes I found that you really need two boxes to be able to cover most options for the team. For example, you can have up to four Ghouls while the box set only has two in it. So two weekends ago I went down to my local shop and picked up another box.
Some nice models in the box
So with the second box acquired, I set out to build the models. Now anyone that knows me understands that I can not have duplicate models in a project, I have to convert the duplicates to give them each there own look. Now I have to say, that these models are a pain in the butt to assemble, the skeletons reminded me of the early days of GW with the torso and legs being glued together on the back bone, well these did as well. Very finicky and a pain to get together, I would not recommend this to a beginner as the first plastic team to assemble. This took me a few hours just to get all the models assembled. I did start altering one of the Ghouls so I would not have a duplicate pose.

Team picture minus paint
 So the second box was for the zombies, skeletons and two other ghouls. So i started with the easy ones, the Ghouls/ Having a large AOS Flesh Eaters army so that means I have a huge amount of extra bits. So I did some arm swaps and head swaps to get three unique looking models.

Some conversion work
 I then tackled the skeletons which many look the same, not alot O could do about it, but their arms are in different poses. The Zombies were a bit more fun, as I cut and reassembled limbs to give each one a different look. In the below picture you can see two of my custom tokens that I use for the game. The Undead comes with a Hand reaching up to be used for rerolls, TDs and turns. You also get a coin for flipping. So I took the had and placed the coin in it, this will be my TD token. Then the other hand I added a single dice to be my re roll counter. The hand all by itself will be the turn token, little things like this make the team.

Tokens and models
 So there you have it, this past weekends work, now onto painting and planning a team display board.

TK

Tuesday, July 14, 2020

Well,

This Rona thing doesn't want to end and I am experiencing some sort of gaming depression from not being able to game. I have projects, but I am in the mood of why? Why should I finish these? Whats the point? That sort of thing. So to combat that I decided I wanted to do some model building to sort of switch gears. Now for years I have been seeing the Star Wars kits from Bandai, so this past weekend I decided to pick up a few of their kits.

One kit I picked up was this traditional Storm trooper kit. Being a fan of the movie, one year for Halloween my mother made me a Storm Trooper costume out of black sweats and foam trays that meat comes in (washed of course) and a papermache helmet. So when I saw this kit I knew I had to give it a go.

Aren't you a little short to be a Stormtrooper?
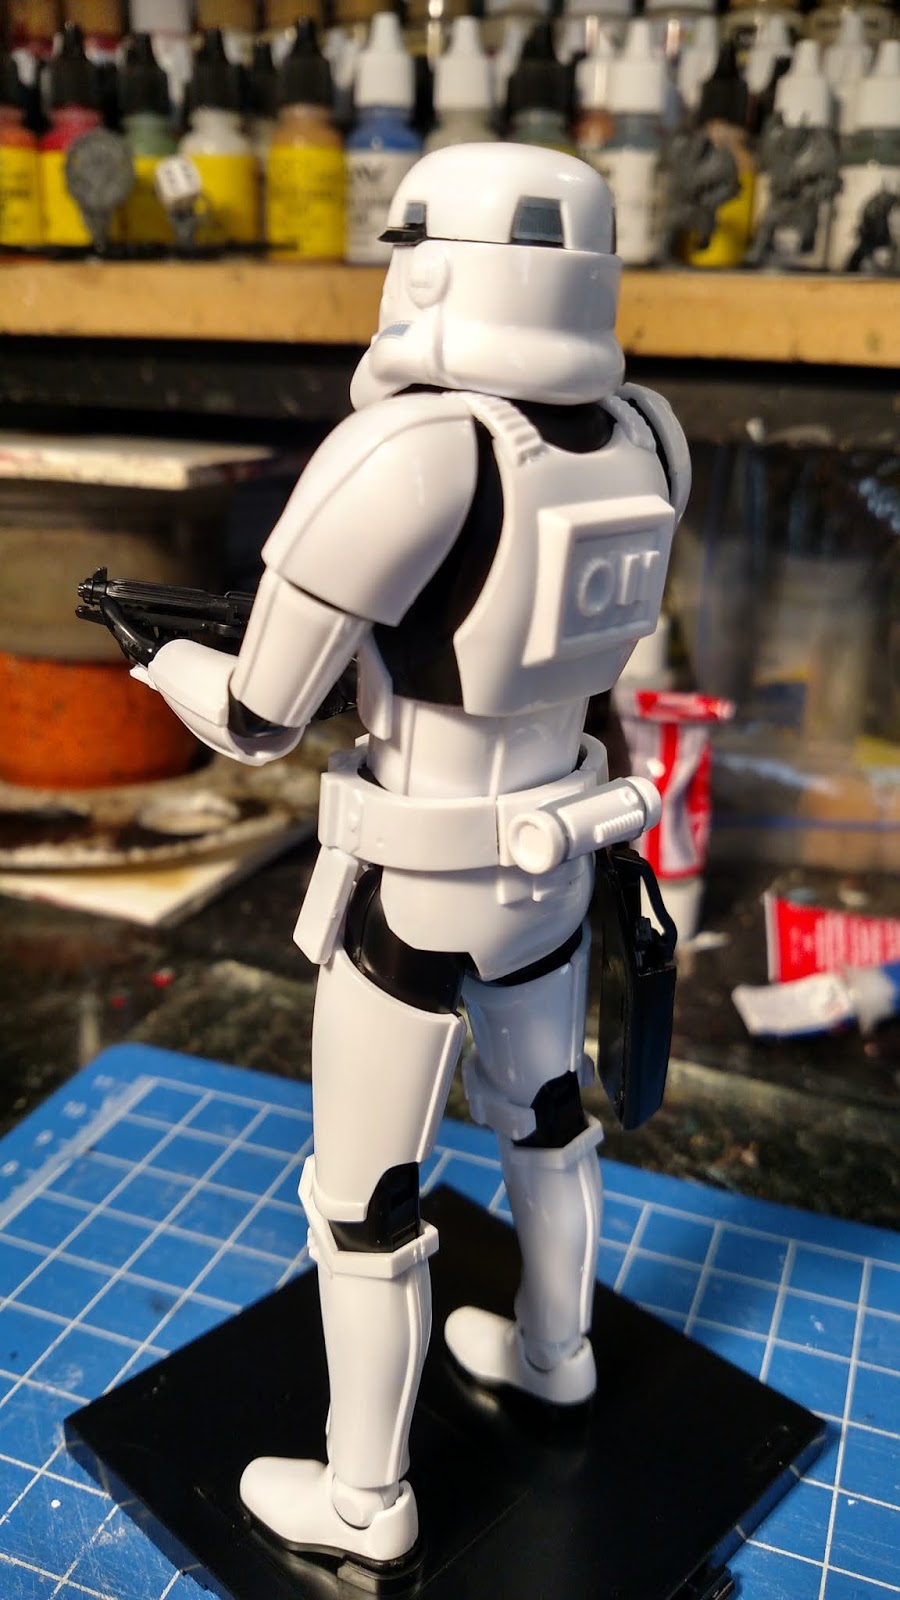
 Now my only experience with the Bandai kits, was a few years ago I built a basic Gundum kit and what I remembered of that it used very little glue. This kit is the same thing, used minimal glue and everything is pre painted. The other thing that I noticed is that there is no flash and I mean none on any of the frames! The Japanese have truely mastered the plastic model kits, heck even some of the frames are molded in different colors on the same frame!

At the Ready!
The detail on this kit is amazing and as I said most of it did not require any glue. The only issue I had was there is an ammo pouch or something on the left leg, when I went to snap it on, it broke in half. I glued it back together once I had it on his knee, other then that, it was the only issue.

Back Detail
 So it took me about 4 hours to assemble the kit, did not painting on it and used very little glue (non was actually needed. So I highly recommend this kit for beginners or advanced modelers alike. All you need is a good way to remove the parts, maybe a sanding stick, but that is it. Now I am planning on picking up at least one more Storm trooper as I want to weather one like the troopers in Mandolorian, with dirt and stains on it. Heck, I may try to build a collection of these kits!


Looking very imposing!
So there you go, I am working on another Bandai kit for my son, all I can say is, Too infinity and beyond!

TK

Monday, July 06, 2020

Diablo Canyon build

Well,

This Fourth of July weekend I got back to working on my Canyon boards for Gaslands as well as other games I play. So leading up to this past weekend I have been watching a few videos on doing Tombstones out of pink foam for decorations at Halloween. One product that most DIY haunters use is this product called Drylok, which is used to seal up floors and walls to keep moisture out for basements and such. Well the haunters like it because it adds a flexible hard shell that keeps the foam dry. They also like it because it has small particles in it and looks like stone when dry. So I went to Home Depot and bought a gallon for less then $25.00 to try out.

Magic in a can!
 I have been looking at using quick drying tile grout as I knew it would be hard, but it also added a ton of weight. And when I saw the Drylok, I figured if it helped keep the foam from getting mashed up and had a good finish, it was a win win for what I was going to use it for.

Foam canyon
So Thursday night I applied a liberal coating of the material with a cheap 4" brush and went to town. Now the Drylok is very thick and it recommends mixing it while working with it. I also dabbed the material on as opposed to painting it on as I could tell it would leave brush marks and I wanted a more natural look to it.

First pass on the canyon
 Here is a close up once it dried, which it was set up in about an hour, but I left it over night to dry all the way. It covered the foam very well and it has a very natural look to it. I also used the Grey color, they do have a tint able version for a few bucks more, but as I was going for stone, grey would work out very well and I may be doing some tombstones so grey was perfect. 

Close up once dry.
 So with it dried, I went to painting it. Now another paint method I picked up from the Haunters was what they call Tea Staining which is pretty much what we call washes in the hobby. But it gave me an idea, so I busted out some Americana Burnt Umber and a cup of water and started to wash it over the base grey, I liked it so much that I did all four boards with one container of the Burnt Umber. Basicly I watered down the paint and washed it down from the top and let it naturally flow down the cracks. Once it had dried I did the same with a black wash, followed by adding in some Raw Sienna. Once that was dried completely, I started dry brushing on Americana Mississippi Mud and Desert Sand colors to the rocks.


Top no dry brush, bottom with drybrushing.

Another close up of the painting with two boards stacked on top each other.
I was only able to get one of the four sections dry brushed and will be doing the others over the next few days, I will then be going in and adding some small details to the boards like clumps of dried grass and such.

Canyons coming along.
So overall I love the drylok and the painting, one thing that I can't stress enough, is to wait until the washed dry completely or you will get a muddy look to the colors. Variety on colors also, the more colors you add in the more realistic it starts to look.

TK


Tuesday, June 30, 2020

Necromunda buildings

Well,

Necromunda is one of my all time favorite games and we have been playing since the re release of it. I have the Death Ray Designs wall set for the tunnels, but I realized that I did not have any other terrain for more 3D games.

So one of my projects this year is to build up some terrain for the game, I still have my old cardboard terrain, but will be using those as templates for a few other structures and bring them up to today's standards. In the meantime I found two old projects that my buddy Robert and I worked on a few years ago. All that they needed was paint, well the green building needed a new base as the wood Masonite one got wet and busted. The green little building was made from old Cities of Death terrain from Games Workshop. The green building also has an engine from a Land Raider in it and looks perfect as some sort of generator. I remember these being a tad tall, but with today's figures, they work fine now.

Green building 
 As with all my weathering, Vallejo Environmental paints were used as well as a few Americana craft colors. The key with weathering is layers, I just paint/dab on colors in somewhat of a randon spots (areas I think would have filth or rust) and just go to town. Hardest part is to know when to call it done!
Big Door side

Where is the Adeptus Mechanicus now?
The second little building was basically just four old Necromunda bulk heads glued together, we wanted some smaller building to be used as scatter terrain, all I did was cut some PVC for the roof and glued on the light. I also added two old rhino doors to make the bulkhead  door look closed and just added a plastic base to it to match the other one. The nice thing is I could use these as LOS blockers in the tunnel version as well.

This one was painted yellow and my tried and true weathering was used on it like the green building. I wanted this one to feel very industrial by going with the yellow. I like it, my wife said its cute in a disgusting way, I will take that as a complimet!

Little Yellow building

Old Necromunda Bulkheads.

The other side
Here are the two side by side in all their weathered underhive glory, these will look nice on the table and as I said above, I could use these with my DRD walls.

Two dirty buildings!

The backside of the dirty buildings!
I am working on a complete scratch built building that I will post up once I get it finished, my goal is to have enough terrain for a 2'x3' table.

TK